The recently released 46 page “Building Skills for Life” report examines instances of Computer Science education across the world and, through this lens, attempts to summarise what all countries should do in order to introduce CS education or expand their existing provision.
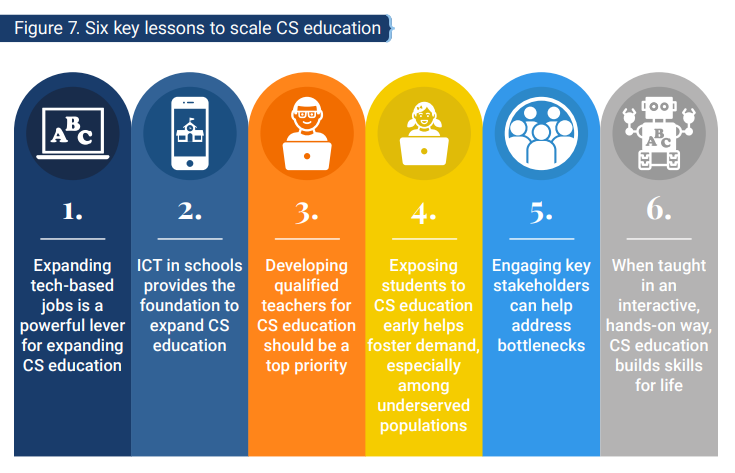
It was written to highlight the inconsistencies in CS education worldwide and to showcase examples where initiatives have improved outcomes for CS learners.The Brookings Report suggest six key lessons to scale CS education:
- Expanding tech-based jobs is a powerful lever for expanding CS education
- ICT in schools provides the foundation to expand CS education
- Developing teachers for CS education should be a top priority
- Exposing students to CS education early helps foster demand, especially among underserved populations
- Engaging key stakeholders can help address bottlenecks
- When taught in an interactive, hands-on way, CS education builds skills for life
I want to point out that I don’t disagree with the recommendations but, in order to successfully scale CS education, I think a lot of groundwork awaits. I plan to look at each recommendation from a Scottish perspective and highlight any potential problems or bottlenecks for implementation.
Do we need to expand tech-based jobs in Scotland?
The first recommendation from the Brookings Report is to expand tech-based jobs and use the increased demand as a lever for increasing the level of CS education. I keep hearing about how many unfilled jobs there are in digital but haven’t looked at this area in any depth. As an educator I’ve been focussed on pedagogy, pathways and assessing students (in the absence of SQA exams) for the past two years however when I took on my current role in 2019 one of my first priorities was to link what we teach to what was required for life, work and continuous learning.
Here in Scotland Kate Forbes MSP is soon to talk about how our country’s economic recovery will be technology-led. However the digital sector is not one of our primary industries (these being agriculture, forestry, fishing, oil and gas). The national digital strategy, published in 2017, included analysis of employment and earnings which highlighted:
“Employment in the digital sector was 64,100 in 2015, accounting for 2.5% of total Scottish employment.”
(Business Register and Employment Survey)
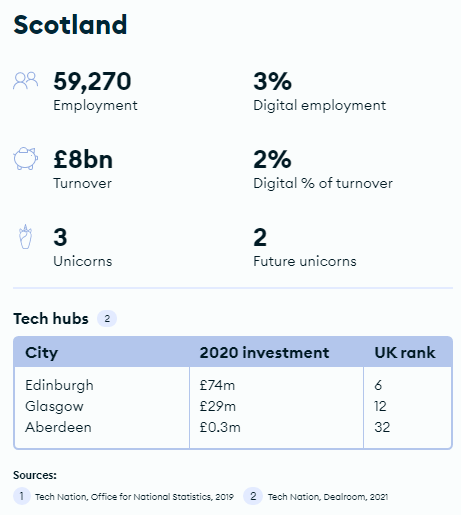
As this report is perhaps a little out of date I looked at alternatives that were released more recently. The TechNation 2021 report puts employment in the digital sector slightly higher at 3% with Edinburgh gathering the majority of investment:
An advisory group report “Towards a Robust, Resilient Wellbeing Economy for Scotland: Report of the Advisory Group on Economic Recovery” (June 2020) stress the importance of:
“…critical investment in the country’s digital infrastructure to improve connectivity, reduce inequalities and build the country’s resilience”
They also highlight the importance of digital skills in all sectors:
“Digital technology, skills and connectivity are key as firms adapt to new ways of working. Firms without the necessary skills, technology, or connectivity could struggle to adapt. Across Scotland, there are a number of sectors with considerable digital skills gaps. Skills gaps relating to digital technology are most prevalent in: Agriculture, Hotels/Restaurants (taken to be roughly equivalent to Accommodation and Food Services) and Retail.”
This is promising. There is robust evidence that there is a digital skills gap and this is key for economic recovery following Covid19 restrictions. However I strongly feel there are a few problems.
Problem 1: Consistency within job adverts
A 2020 blog post by ScotlandIS VP of Ideation Dermott Murray suggested that
“There is an annual requirement for an additional 13,000 digital jobs in Scotland but we are only producing around 5,000 new recruits each year through universities or apprenticeships. A report by PWC last year outlined the economic opportunity, forecasting that 7.2 million new digital jobs will be created across the UK by 2037.”
That there are around 13,000 jobs requiring digital skills posted annually suggests that they won’t be too hard to find with a quick keyword search. However after investigating three job search websites I discovered that there aren’t actually that many roles that require explicit digital skills at the moment:
| (keyword) | Indeed | s1jobs | glassdoor |
| digital | 3736 | 333 | 2832 |
| ict | 123 | 50 | 106 |
| computer | 3321 | 276 | 2416 |
| technology | 3635 | 2 | 3018 |
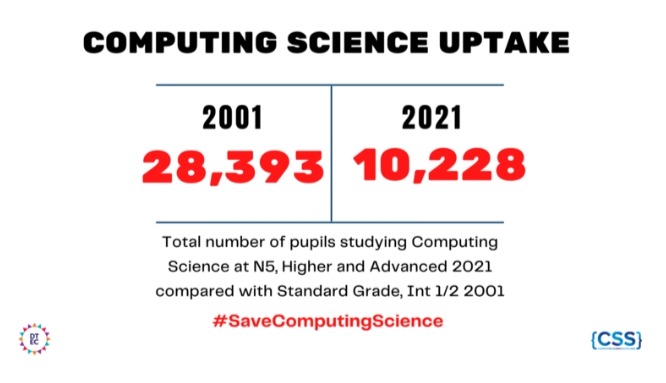
Given that there were 10,228 students who achieved National 5, Higher or Advanced Higher in Scotland in 2021 (Digital Technology Education Charter) and not all of these students will take CS at further or higher education, are the amount of available jobs in the digital sector still too low a figure to be a viable argument for increasing CS capacity in Scottish secondary schools?
Pre-Pandemic the UK Government’s Department for Digital, Culture, Media and Sport published a call to action highlighting two pieces of research they had commissioned on the demand for digital skills in the job market. Minister for Digital and the Creative Industries Margot James underlines the importance of understanding the demand for digital skills:
“…to do this, and to inform Government policy, the Department for Digital, Culture, Media and Sport commissioned two reports. The first report – No Longer Optional : Employer Demand for Digital Skills looked at the current demand for digital skills (analysing over nine million online digital job vacancies). The second report – What digital skills do adults need to succeed in the workplace now and in the next 10 years, considered how the demand for digital skills might evolve in the future.”
In the first report it is suggested that
“…a third of all skill-shortage vacancies were attributed, at least in part, to a lack of ‘digital skills’”
(Employer Skills Survey, 2017)
Backing this up the Disconnected? report by independent charity World Skills UK found that:
“Over nine in ten (92%) employers said that having a basic level of digital skills was important for employees at their organisation, with two in three (64%) saying this was very important.”
However in their conclusion they are concerned that 1/3 of employers feel that their workforce lack the advanced digital skills needed, including those just leaving formal education.
In all my reading for this blog post it was never really made clear what these essential digital skills were and the further I delved the less convinced I was that current CS educators were aware of this either. So I looked for explicit statements of skills. The 2019 guidance Essential Digital Skills Framework from the UK government suggests that adults should have the following digital skills:
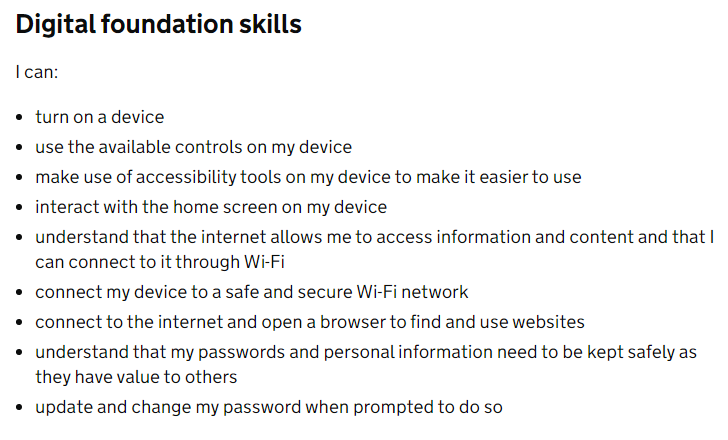
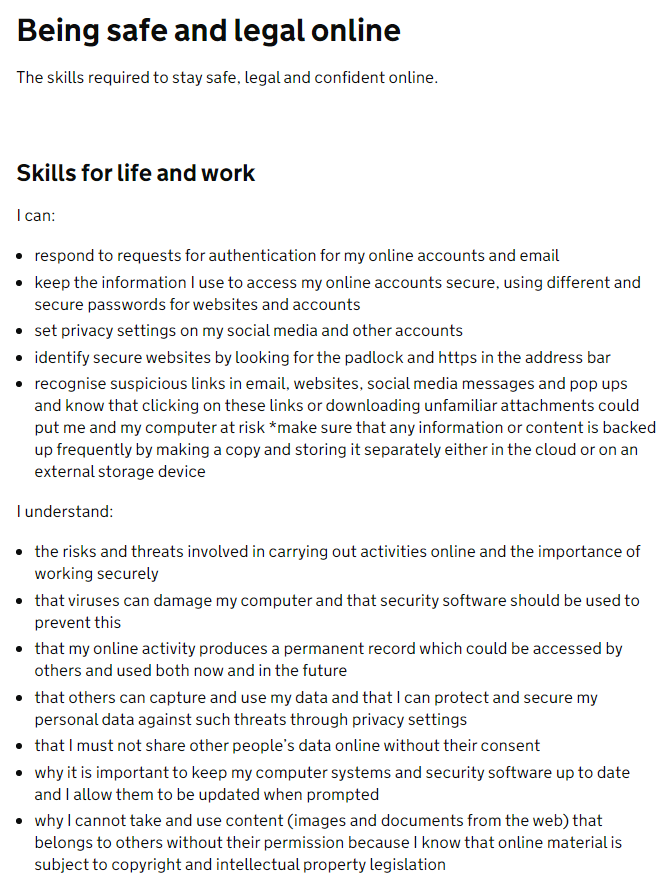
This is a useful reference as, if all employers expect this as a minimum level of digital skill, they must be including reference to this in their job adverts… surely?
Adjusting my original search terms I revisited three job websites and gathered the following results:
| (keyword) | Indeed | s1jobs | glassdoor |
| digital foundation skills | 221 | 4 | 180 |
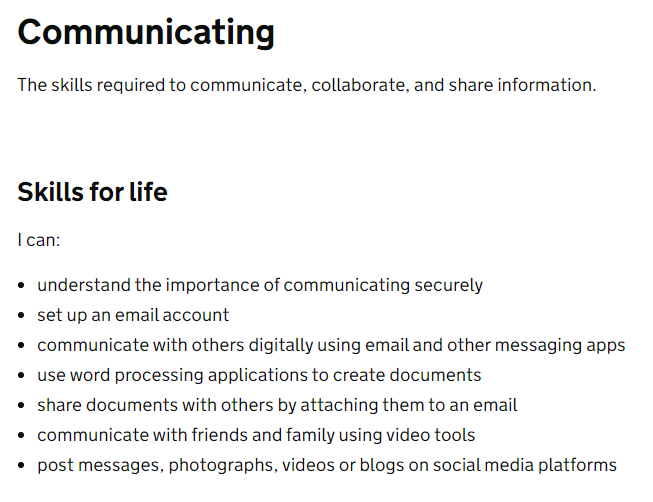
| communicating | 1682 | 112 | 1131 |
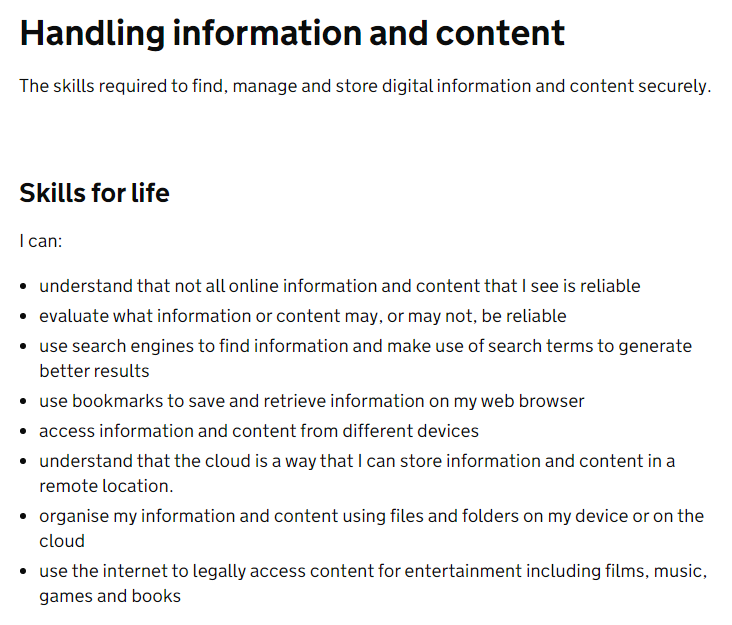
| handling information and content | 28 | 14 | 29 |
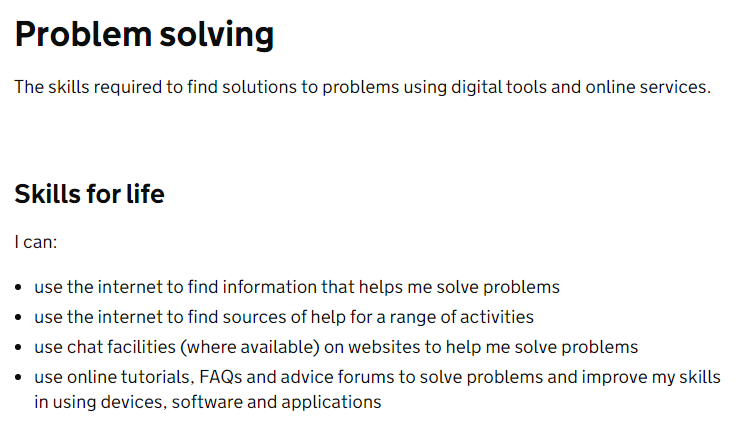
| problem solving | 3566 | 253 | 2910 |
| being safe and legal online | 59 | 5 | 38 |
With the exception of problem solving searches like these gather less job adverts. How can individuals find roles that harness their digital skills if the sites or adverts aren’t aligned to the essential categories?
Problem 2: Self-evaluation of digital competence
If job searches can be improved and individuals can resource adverts which require specific digital skills it is likely that more of these positions will be filled however it generates another problem. One which can currently only be resolved by the individual themselves.
I have always believed that confidence impacts competence and self-evaluation of your own skills can be problematic if you aren’t trained in ‘knowing yourself’. A 2014 metasynthesis by Zell and Krizan Do People Have Insight Into Their Abilities? concludes that “there appears to be a consistent, moderate relationship between self-perceptions of ability and measures of performance across a variety of domains and operationalizations of these constructs”.
In addition to this as educators we may train our young people in the skills to be good communicators who have experience in solving a variety of problems and are aware of the need to be safe and secure when online but their competence depends in part to the confidence of the educator delivering the training.
It might be that it isn’t just our young people (and their teachers) who aren’t great at self-evaluating their level of digital competence. Scotland’s Digital Economy Maturity Index (2014) also highlights that less than 20% of businesses surveyed considered themselves to be confident in the use of digital technologies:
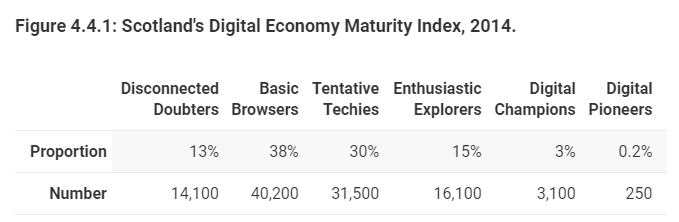
However in 2017 this had improved to 24%
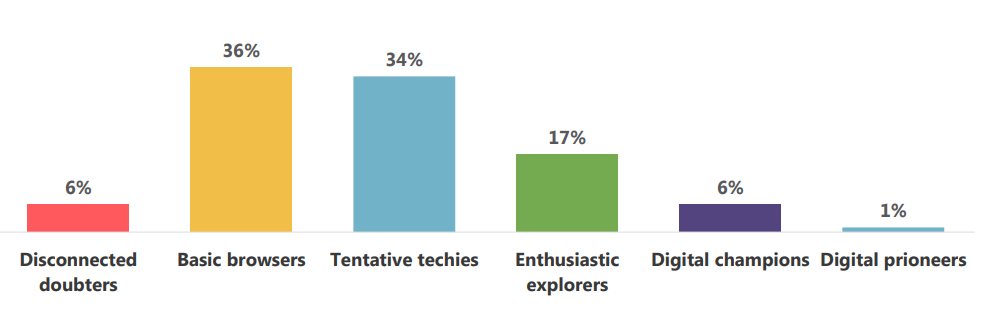
and in 2021 this had increased again to 28%.
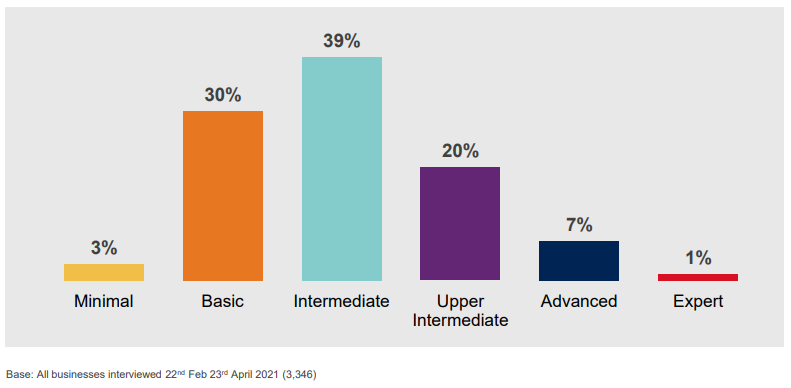
The DEMI category titles were adjusted between 2017 and 2021. This change in indicators means findings are not directly comparable with those of 2017.
Applying Zell and Krizan’s assertions to the above figures would suggest that many Scottish businesses have a weak correlation between their own evaluation of their digital maturity and their actual performance. In short many will be underestimating their level of digital maturity, perhaps because they don’t fully understand the skills that they use in their everyday work demonstrate digital maturity. The slight increase in perceived competence from 2014-2017 may be due to Zell and Krizan’s suggestion that “self-perception accuracy may improve as experience with tasks grows over time”.
If we ask students about their confidence in specific digital skills we should expect their estimations to be, in the early stages of learning any new skills, less accurate than if we survey them after they gain more experience in putting these skills into everyday use.
I think it would be very interesting to survey individuals on which of the six categories of digital maturity they consider themselves best aligned with, using the framework of essential digital skills as a guide. For example, with preparation and guidance around how to self-assess competence in each of the framework categories, the following could be regularly completed by individuals in order to update their online job-seeker profile:

If schools, colleges and universities also used the same framework to provide feedback to their learners it would increase the accuracy of self-assessment over time and allow other initiatives to support student progress in digital skill building such as pathways aligned to each level of confidence e.g. intermediate confidence in being safe and legal online could be demonstrated through completion of the NPA Cyber Security level 4.
Recommendations
I suggest that, rather than expanding tech-based jobs, the priorities should be to:
(1) highlight the digital skills required within all work vacancies using consistent language, meta tags that relate to a common framework and a developing a system that allows job seekers to filter within job search results or (even better) have recommendations that link to candidate skills pushed to their inbox;
(2) ensure that individuals are challenged to self-assess their own competence in digital skills on a regular basis in order to improve the accuracy of their self-perception which would then improve the confidence of candidates in applying for specific roles. It may even be beneficial for this to co-exist in the system job seekers are using to find roles.
Predicted Impact
This will allow for better tracking of the digital skills gap and help individuals understand what they need to do in order to meet their individual areas for improvement, allowing them to make informed choices in their education. Businesses could also better understand how individual courses align to the digital skills they need for sustainable economic recovery.
The resulting analysis could better support any argument for scaling up CS education in Scotland and providing better pathways from school to industry for all.